Using Monorepos for Enterprise Scalability
What is a Monorepo?
A monorepo is a single repository that holds all of the code for every application in the business portfolio. While this may sound counter-intuitive, I promise it isn’t. The stucture of the monorepo is very different from a monolith application, and provides the kind of flexibility needed to support rapid growth without having to go back and re-architect the whole stack every few years.
Monorepo vs. Monolith
A monorepo is different from a monolith in the sense that a monolith holds all of the platform, api, and front end code without any separation of concerns. This is not scalable for obvious reasons. As the business grows, the monolith will rapidly become harder and harder to support and manage. This is why we want to separate our frontend code into monorepo that can be rapidly scaled. Individual packages in the monorepo can be refactored and even rebuilt using different libraries as web technologies evolve. For example, with some configuration prowess, I could feasibly have an application where my home page is built with Svelte and the rest is built with React. By building each page of your application as an SPA package, you could use redux for state management on one page, while keeping things simple and using the context API for other pages.
Monorepo Architecture
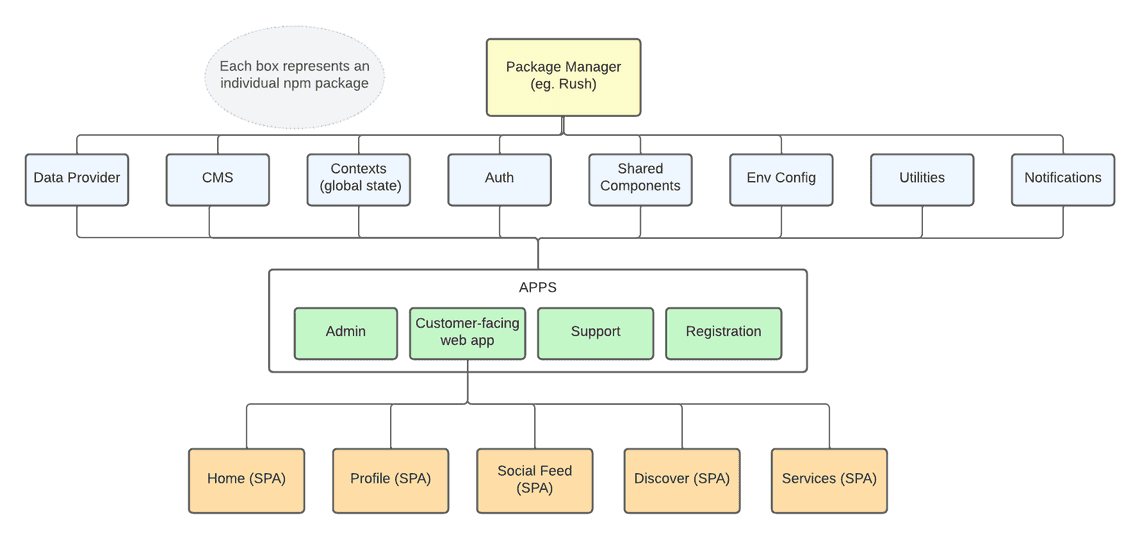
In a monorepo, everything is separated into individual projects in such a way that each folder can be compiled to an npm package and pulled in by each application on as-needed basis. The following diagram is a high-level view that illustrates how the individual packages might fit together for a social media application.

A monorepo can be easily set up using a package manager library such as Rush, Lerna, or Yarn Workspaces. In this article we won’t go through how to set these up as that information can easily be gathered from the package manager’s documentation. We’ll instead talk through the architecture of a monorepo.
Folder Structure
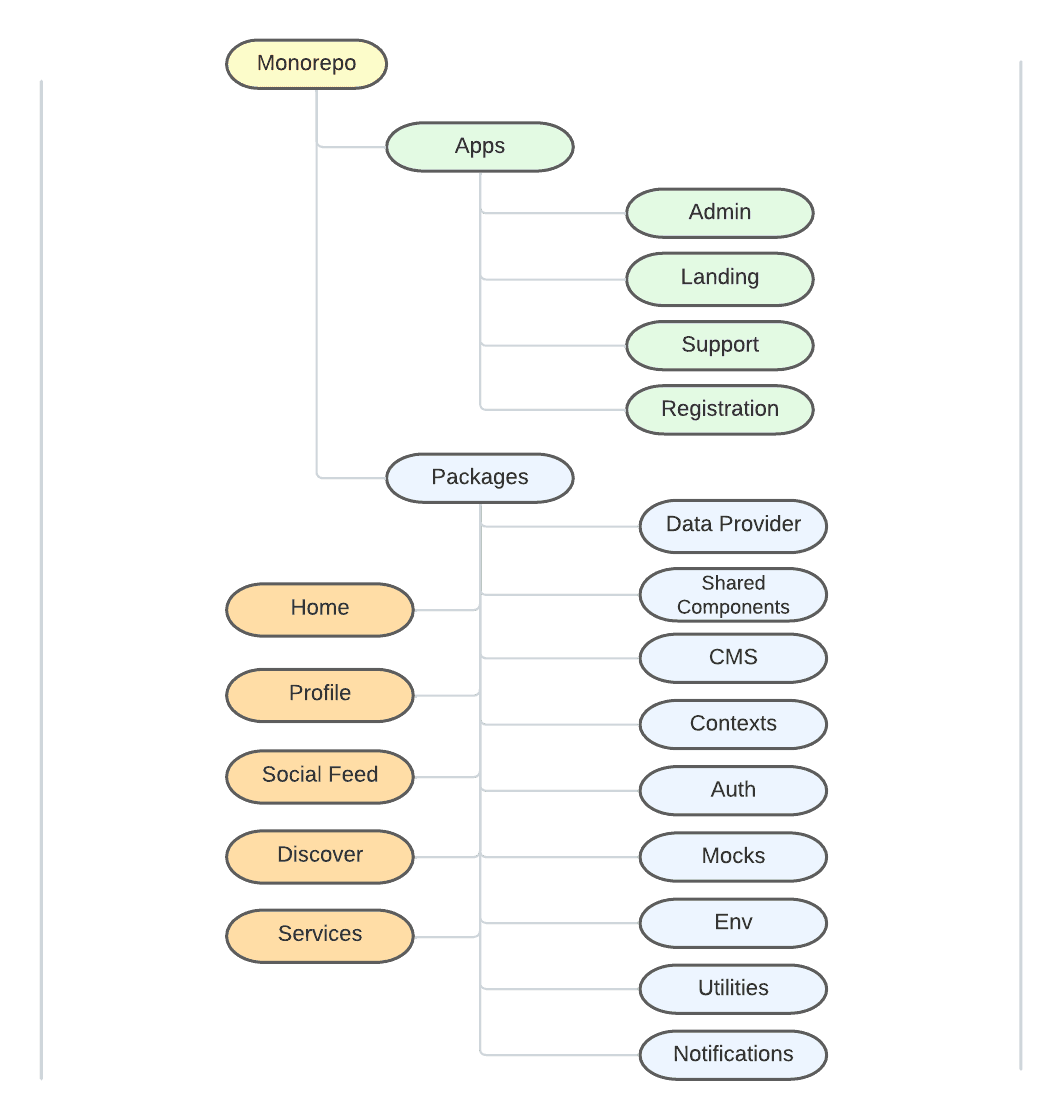
The folder structure of a monorepo usually contains two main folders: Apps and Packages. The Apps folder contains each of the front end landing sites. Each frontend landing site can then pull in pre-compiled packages if you want each section or page of the site to be self-contained. The following diagram illustrates what this might look like:

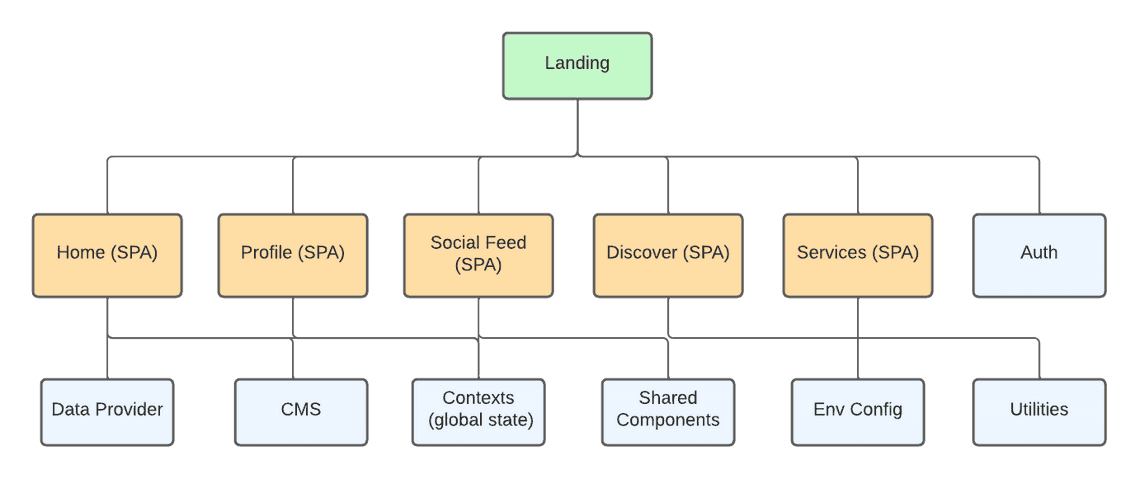
Keep in mind that this figure shows only the packages for the pages included in the Landing application (in orange).
Landing Flow
Let’s take a look at how these peices fit together by looking at what we’ll call the Landing application, which in this scenario is a customer-facing product. There are 5 routes to landing, which are denoted in the orange boxes in the diagram. Each of these routes have considerably large codebases (more than 10,000 lines of code) and so they are split out into separate projects/packages, each with their own package.json and set of dependencies to make thme more manageable. Landing has dependencies on these five single-page application packages, as well as auth. The packages that represent the pages of the app have dependencies on the library packages.

The Landing application’s responsibility is to set up the application framework and handling route changes by loading application packages on demand. Since navigation is specific to Landing and is part of the application structure, it is also contained inside of the Landing application. It is worth noting that Landing also has a depdendency on the Data Provider package, because it does some some initial data fetching to set up the navigation and user profile.
Application Setup
When Landing is loaded, it does the following:
- Load the auth provider, which does an authentication check and loads the login page if necessary.
- Load routes: Callback, SilentRenew, LogoutCallback, Logout, and PrivateArea, which are contained in the Auth package
- If the user is authenticated, PrivateLayout is loaded, which sets up the data provider. In our example we use React-Query, so we set up the QueryClient. We also load our notifications context from the contexts package, which looks something like this:
const client = new QueryClient()

export const PrivateLayout: React.FC = () => {
  return (
    <QueryClientProvider client={client}>
      <FeatureFlagsContextProvider>
        <NotificationContextProvider>
          <TrackerGlobals />
          <Layout />
        </NotificationContextProvider>
      </FeatureFlagsContextProvider>
    </QueryClientProvider>
  )
}

export default PrivateLayout
- After that happens, Layout is loaded, which does the initial data fetching to set up the navigation and startup data through react-query.
- Additional Context providers are loaded for global state, including one for tracking telemetry, the user’s profile, and theme.
- It also sets up the language based on the user’s profile information and passes that to the CMS context provider for translations.
- After that happens, a PreliminaryCheck component runs some checks before the loading of private routes. This includes checking for any consents (eg. terms, update privacy policies, etc.) that must be signed, and setting up the profile if it is the user’s first login.
const Layout = () => {
  const siteNavQuery = useSiteNavigation()
  const startupQuery = useStartupData()
  const { logout } = useAuthServiceContext()

  useLayoutEffect(() => {
    if (siteNavQuery.data) {
      const htmlTag = document.querySelector('html')
      if (user_language) {
        htmlTag?.setAttribute('lang', user_language)
      }
      if (is_rtl) {
        htmlTag?.setAttribute('dir', 'rtl')
      }
    }
  }, [siteNavQuery.data])

  if (siteNavQuery.isError || startupQuery.isError) {
    return <ErrorState onError={logout} />
  }

  if (siteNavQuery.isLoading || startupQuery.isLoading) {
    return <LoadingState />
  }

  if (!siteNavQuery.data || !startupQuery.data) {
    return <ErrorState onError={logout} />
  }

  const startupData = startupQuery.data
  const siteNavData = siteNavQuery.data.Data
  const profile = startupQuery.data.profile

  const telemetryConfig = {
    //...
  }

  const contextValue = profile.me.user_language
    ? getResources(profile.me.user_language)
    : getResources(getBrowserLanguage())

  return (
    <TelemetryContextProvider configData={telemetryConfig}>
      <ProfileContextProvider value={profile}>
        <ThemeContextProvider>
          <CMSContextProvider value={contextValue}>
            <PreliminaryCheck>
              <PageContainer top={<Nav />}>
                <PrivateRoutes />
              </PageContainer>
            </PreliminaryCheck>
          </CMSContextProvider>
        </ThemeContextProvider>
      </ProfileContextProvider>
    </TelemetryContextProvider>
  )
}
export default Layout
The routes contained in PrivateRoutes specify elements that essentially just import the respective package and load the App component.
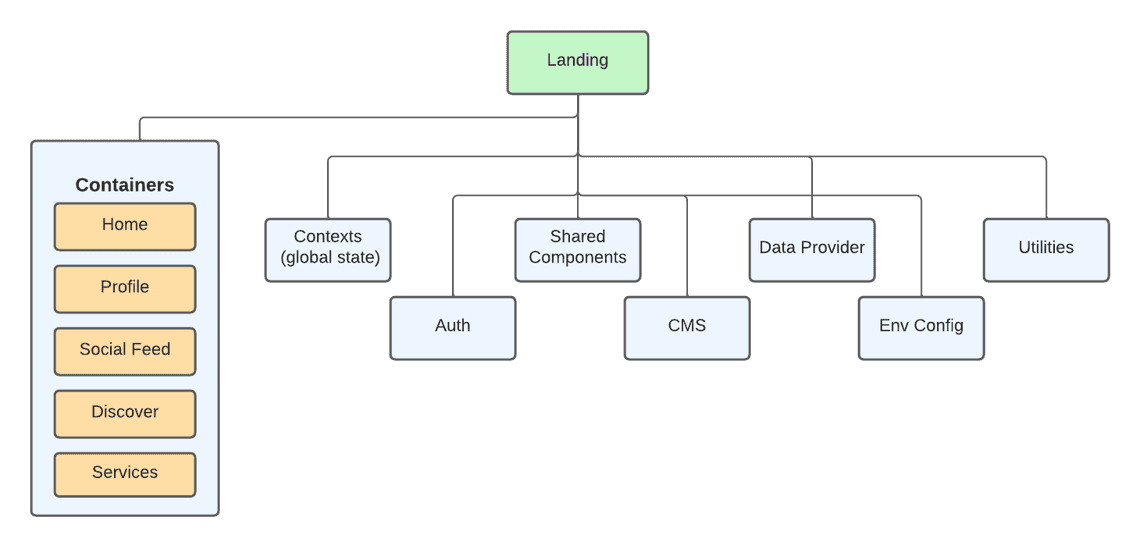
When you have an application with a lot of pages and you don’t want to have every page as its own separate package, you can consolidate them into a single package called Containers or Pages. Here’s what that might look like:

For smaller applications, such as our Registration app in the /apps directory that only has 5 fairly small pages with a limited number of components, we can keep all of those pages contained within /apps/Registration. Separating those out would just add unneeded complexity. However, the Admin application is another big application. For this we have 6 categories, each with 5-10 pages with varying levels of complexity. These pages could reasonably be built as individual npm packages as well, but doing so will make our monorepo harder to navigate.
When building new functionality as a developer, you’re constantly switching between packages. In the process of adding a new admin page for example, you’d set up a new endpoint with react-query in the Data Provider, adding string resources in the CMS package, creating new components in the shared components library, adding new contexts in the Contexts package, creating the page container in the Containers/Pages library - you get the idea. You need to be able to quickly move between these packages and adding thirty more packages just for the admin pages would essentially force you to have to hide them in your editor to make for easier navigation. In such a scenario, a containers package for the admin might make sense. You could also create a package for each of the six categories.
The point here is that when you’re using a monorepo architecture, you are afforded a great deal of flexibility and options to structure the application portfolio for maximum scalability. Having loosely couple packages in this way greatly simplifies refactoring because everything is self-contained, and there are less code collisions as well.
Further reading:

